The biointensive growing method is a complete food-production system built around four core practices: deep soil preparation (usually double-digging to 24 inches), heavy compost use, close hexagonal plant spacing, and growing a portion of your crops specifically to feed your soil. Done right, it can produce dramatically more food per square foot than conventional row gardening, use 67% to 88% less water, and eventually sustain its own fertility from within the system. This guide walks you through exactly how to set it up and run it in a real backyard or homestead garden.
Grow Biointensive Method: Step-by-Step Home Garden Guide

Marcus Hendrick
7 May 2026
What the biointensive method actually is (and why it works so well)
The biointensive method, most associated with John Jeavons and Ecology Action, grew out of French intensive market gardening, Alan Chadwick's biodynamic work, and decades of on-farm experimentation. Jeavons' book "How to Grow More Vegetables Than You Ever Thought Possible on Less Land Than You Can Imagine" is still the foundational text, and it genuinely changed the way a lot of people think about small-scale food production. The system is sometimes called GROW BIOINTENSIVE, and it treats a small growing area as a complete mini-farm rather than a hobby patch.
The reason it works is straightforward: plants grown in loose, deeply aerated, humus-rich soil can be spaced much closer together without competing. Their leaves shade the soil, which slows evaporation and suppresses weeds. Diverse root systems at different depths pull water from different zones and redistribute it through a process called bioirrigation, where roots actually move water from wet soil zones to dry ones. Add organic matter and the soil holds up to 75% more water on its own. That combination of deep soil, close spacing, and high organic matter is why the water savings are so large and why yields can be five to fifteen times higher per square foot than traditional row planting.
The method is also designed to be self-sustaining. A big part of the planting plan is devoted to crops that feed the compost pile, which then feeds the soil, which then feeds future crops. It is a closed loop, and that is the part most home gardeners skip, which is also why their soil eventually runs out of steam.
Garden planning: choosing crops, sizing your beds, and laying them out

Before you dig anything, plan on paper. Biointensive gardening uses a specific bed structure: blank" rel="noopener noreferrer">5 feet wide (so you can reach the center from either side without stepping in), often 20 feet long for a 100-square-foot bed. You can go shorter, but 100 square feet is the standard starter unit that Ecology Action's garden checklist is built around. Paths between beds are typically blank" rel="noopener noreferrer">12 to 18 inches wide, just enough to kneel or crouch without compacting the bed.
The crop-area breakdown
Ecology Action recommends dividing your total growing area into three functional categories. This is not just about eating variety; it is about keeping the system alive. The breakdown looks like this:
| Category | % of Growing Area | What Goes Here | Why |
|---|---|---|---|
| Carbon/compost crops | 60% | Corn, sunflowers, wheat, rye, sorghum | Builds the bulk of your compost pile; maintains soil carbon |
| Calorie/staple crops | 30% | Potatoes, dry beans, beets, leeks, garlic | Your primary food calories; high caloric yield per square foot |
| Micronutrient/income crops | 10% | Tomatoes, lettuce, herbs, greens | Nutrition, variety, or cash crops if you sell |
Most beginners flip this ratio and plant 90% tomatoes and greens, then wonder why their soil gets worse every year. The 60% carbon-crop commitment feels counterintuitive until you realize that growing your own fertilizer is the whole engine of the system. If you are just starting out, even a small dedicated bed of sunflowers or corn for compost material makes a real difference.
Which crops to start with
For a first 100-square-foot bed, focus on crops that give fast feedback and are forgiving on spacing: lettuce, beets, carrots, spinach, radishes, and one or two compact brassicas like kale. These are all good biointensive beginners because they respond visibly to close spacing and compost quality. Once you have a second or third bed, add a calorie crop like dry beans or potatoes and at least one carbon crop like sunflowers or corn.
Soil building step-by-step: double-digging, compost, and structure
Soil preparation is where most of the long-term benefit comes from, and it is also the most physically demanding part. Do it right once and maintenance gets much easier over time.
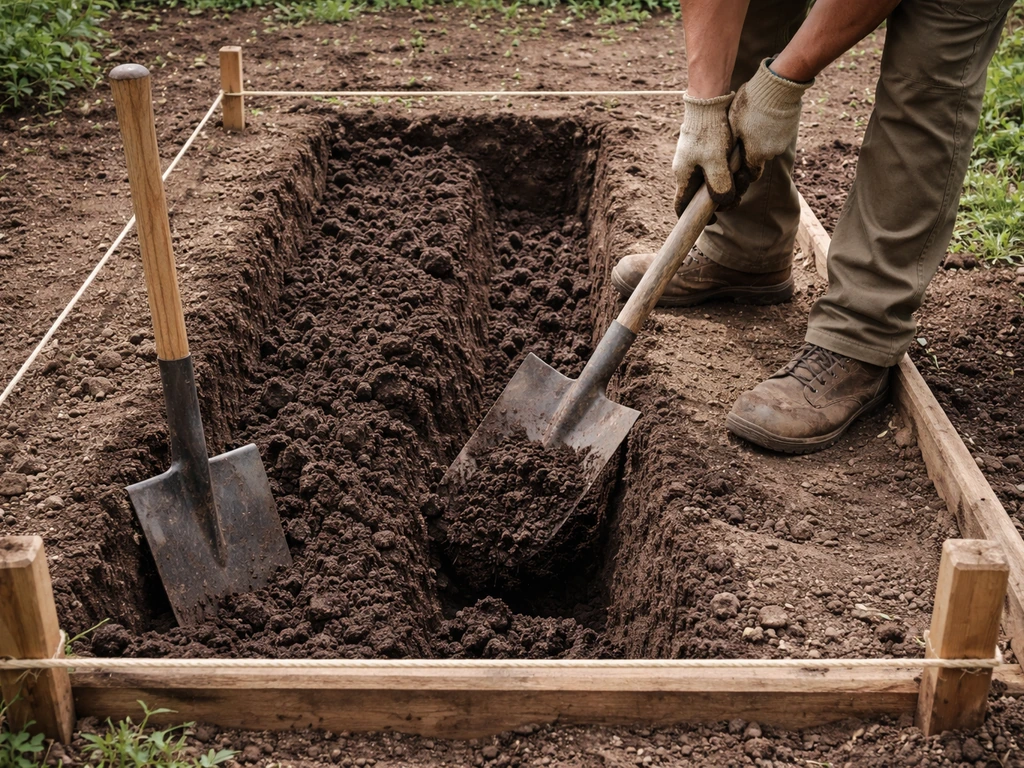
How to double-dig (and when to skip it)
Before you decide to double-dig, push a rod or long screwdriver into your soil. If it slides down to 24 inches without much resistance, your soil may already be loose enough and you can skip to surface preparation and compost. If it stops at 6 or 8 inches, you need to double-dig. Here is the process:
- Mark your bed at 5 feet wide. Remove any existing vegetation.
- Dig a trench 12 inches wide and 12 inches deep across one end of the bed. Set this soil aside in a wheelbarrow or on a tarp — you will use it to fill the last trench.
- Use a digging fork to loosen the soil at the bottom of the trench another 12 inches down, breaking up compaction without removing the soil. This gets you to the 24-inch target.
- Move your board or marker 12 inches (30 cm) back from the first trench. Dig the next 12-inch-wide strip and move that soil forward into the first trench.
- Fork the bottom of the second trench. Keep moving down the bed in 12-inch strips.
- When you reach the last trench, fill it with the soil you set aside from the first trench.
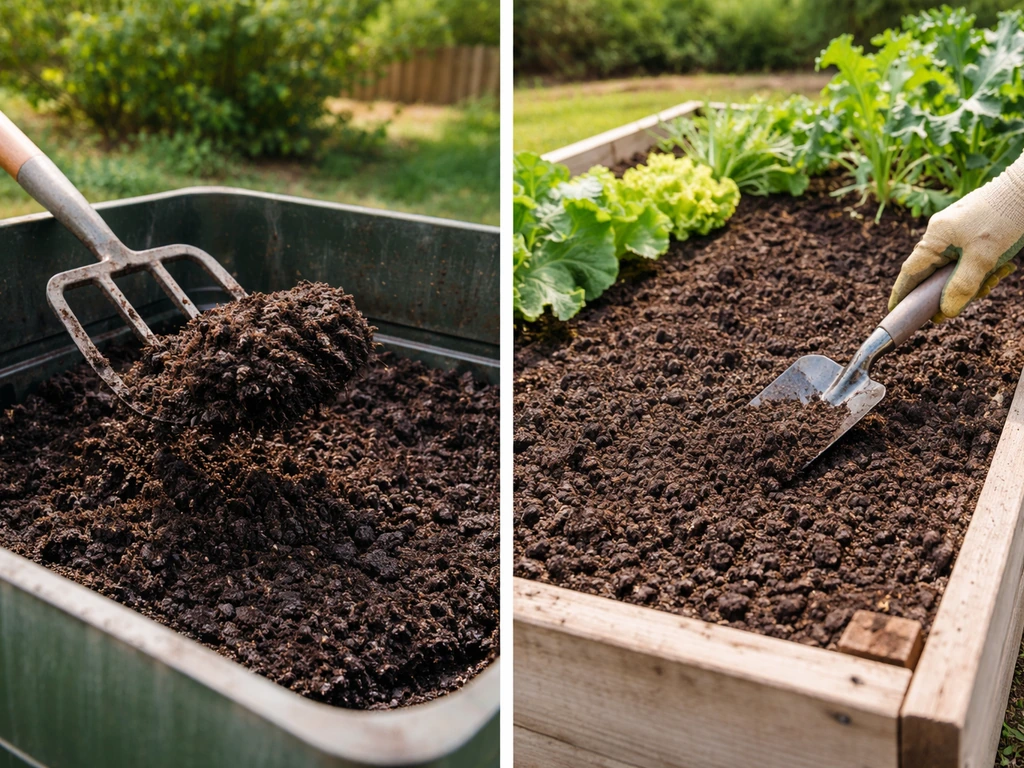
- Rake the surface smooth, then apply compost before planting.
After the first season of double-digging, you typically only need to loosen the surface for subsequent plantings. The deep structure holds if you never walk on the bed. That is the rule: beds are for plants, paths are for people.
Building and using compost
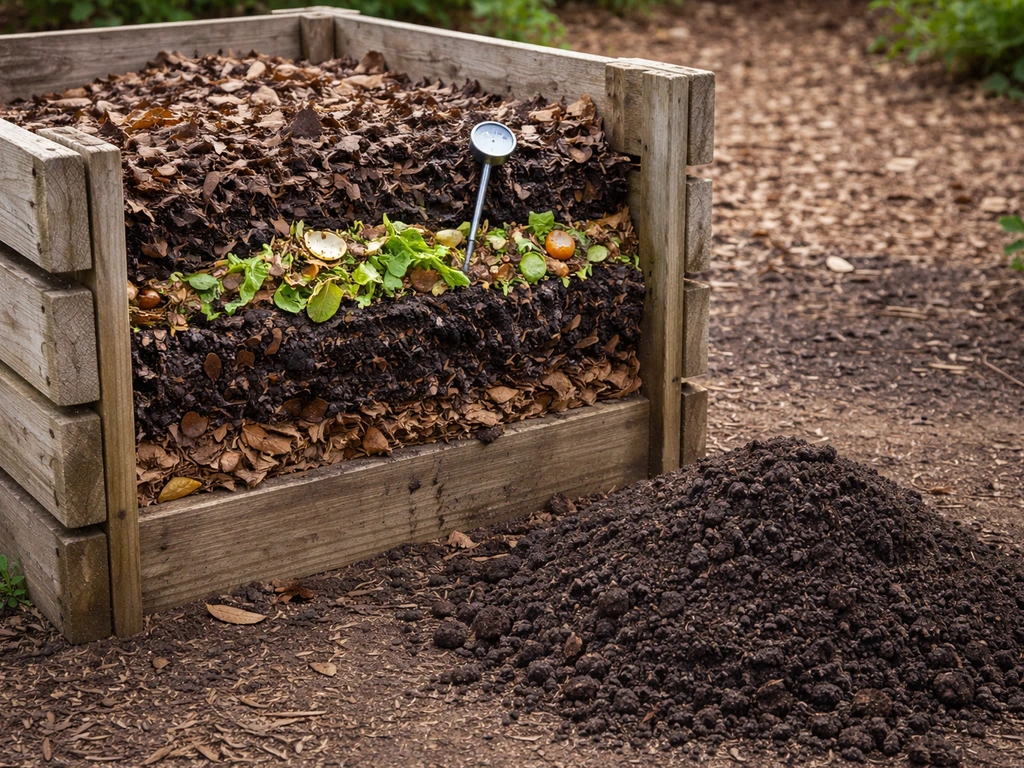
The goal of a sustainable biointensive system is to produce essentially all of its own fertility through compost. That means your compost pile is not optional; it is the fertility engine. Build it with a carbon-to-nitrogen ratio around 45:1 (carbon-heavy materials like dried corn stalks, straw, and wood chips mixed with nitrogen-rich materials like fresh plant trimmings, kitchen scraps, and manure).
Using straw as a carbon source in your compost mix is a simple way to build the “carbon” part of the pile. If you want to speed up composting and build more fertility, it helps to grow better cow manure inputs for your pile. As the pile breaks down, the C:N ratio drops toward 10:1, which is where finished compost typically lands. That finished compost is what you incorporate into beds.
Give a new pile 30 to 90 days to mature before applying it, depending on temperatures and how actively you turn it. Apply a 1 to 2 inch layer of finished compost to the surface of your bed after preparing the soil, then work it into the top few inches. Do this every season. Over years, your beds will become noticeably darker, spongier, and easier to work, and your yields will reflect it.
If you are also growing grain crops or sunflowers for compost material (which you should be), the stalks and stems from those plants feed right back into your pile. That is the closed-loop the system is designed around. Growing your own fertilizer is one of the most impactful things you can do for long-term self-sufficiency. This is why you want to focus on using organic fertilizer sources and letting compost drive that fertility cycle over time.
Growing Medina’s fertilizer starts with building a compost-fed closed loop that keeps fertility cycling through the beds Medina fertilizer. You can also experiment with a trash can grow fertilizer approach to collect and compost household scraps quickly for your next season.
Planting for high yield: spacing, succession, and rotation
Close hexagonal spacing

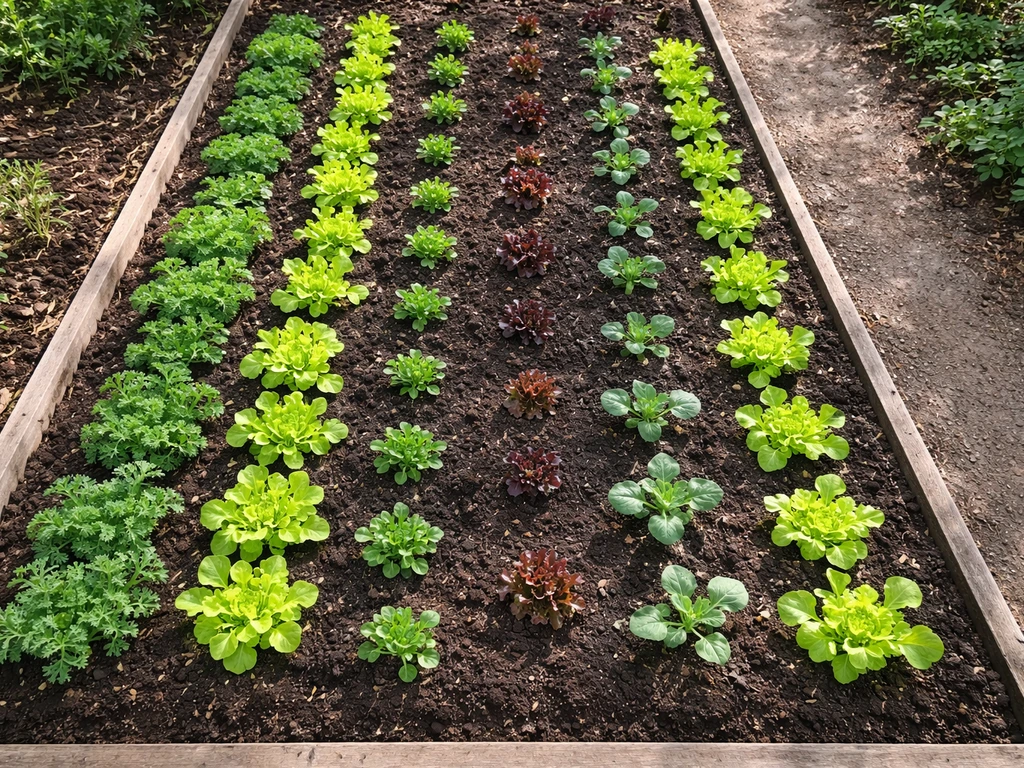
Biointensive spacing uses a hexagonal offset pattern rather than rows. Instead of planting in straight lines with wide gaps, you offset each row so plants sit in the gaps of the row before them. This allows closer overall spacing while giving each plant roughly equal root space. The result is a living mulch: when plants reach mature size, their leaves touch or slightly overlap, shading out weeds and slowing evaporation from 13% to 63% depending on the crop canopy.
Spacing depends on the crop. Carrots get planted on 3-inch centers (3 inches between each plant in all directions). Lettuce heads go 12 inches apart. Beets and other mid-sized roots typically go 4 to 6 inches. The spacing is tighter than conventional gardening, but it works because the soil beneath is deep and rich enough to support it.
Succession planting
One of the easiest ways to boost total annual yield from the same bed is succession planting: as one crop finishes, another goes in immediately. Fast-maturing crops like radishes (25 to 30 days) or baby greens can cycle multiple times before a slower crop like a brassica needs the space. Plan three growing seasons if your climate allows: a cool-season spring planting, a main summer season, and a fall catch crop. Ecology Action's 52-week planning chart is built around exactly this structure, tracking Fall, Spring, and Catch-Crop seasons across about 100 planning worksheets.
Crop rotation basics
Rotate plant families across beds each season. Do not follow brassicas with brassicas or tomatoes with tomatoes in the same bed. A simple four-category rotation works: roots, legumes, brassicas, and fruiting crops (tomatoes, squash, peppers). Move each category one bed forward each season. This breaks pest and disease cycles and prevents nutrient depletion patterns from locking in.
Water and nutrient management: keeping plants fed and hydrated
Watering strategy
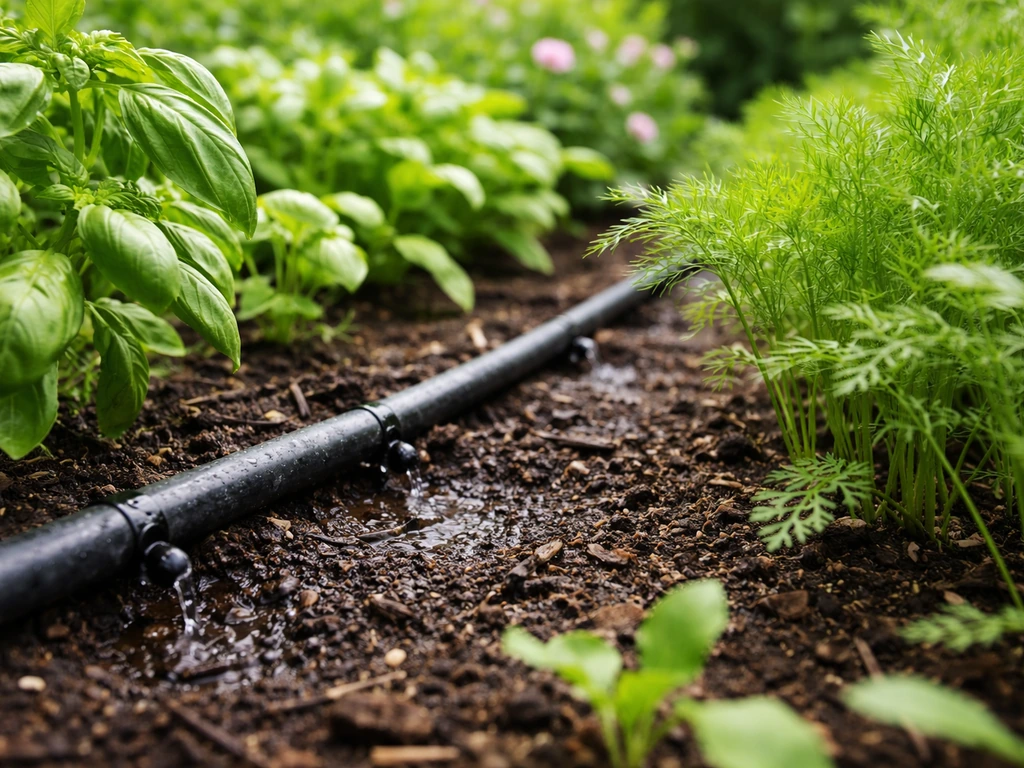
The method's water efficiency comes from three things working together: deep soil that holds more water, high organic matter content that retains moisture, and a closed plant canopy that blocks evaporation. Once those are in place, you genuinely need to water less. But how you water still matters.
Drip irrigation or a watering wand that delivers water at soil level is ideal. Overhead sprinklers waste more water and can promote foliar disease. In sandy soils, water moves through quickly, so drip emitters may need to be spaced more closely together to ensure even coverage. If you are hand-watering, water slowly and deeply rather than frequently and shallowly. Deep watering encourages roots to follow moisture downward, which helps them access the deeper loose soil you worked so hard to prepare.
Row cover fabric like Agribon is worth using in dry or windy conditions. It allows light, air, and some water through while reducing surface evaporation and protecting from pest pressure. Note that some row cover weights cannot be watered through, so check the spec sheet and lift the edges when hand-watering if needed.
Sustaining fertility season to season
The compost cycle is your primary fertility system. Beyond that, you can add specific amendments to address deficiencies: kelp meal or fish emulsion for trace minerals and nitrogen, greensand or glacial rock dust for slow-release minerals, and lime to adjust pH if needed. But the honest truth is that if you are consistently applying finished compost and growing carbon crops for your pile, most of your fertility needs will be met. The system is designed to close that loop over time.
Pest, weed, and disease management in a biointensive system
The close spacing that makes biointensive planting so productive also means problems can spread quickly if you are not paying attention. The good news is that healthy, well-fed plants in deep soil are naturally more resistant. Most pest and disease problems I have seen in biointensive gardens trace back to soil that is not quite ready yet, plants that are stressed from underwatering, or spacing that is too tight before the soil can support it.
Weed management
The living mulch effect of close spacing suppresses most weeds once plants are established. The biggest weed pressure comes in the first two to three weeks after planting, before canopy closure. Shallow hand-weeding with a hoe or collinear hoe works well here. The key word is shallow: you do not want to disturb the soil structure or bring weed seeds up from deeper layers. Once your plant canopy closes, weed pressure drops significantly and you mostly just pull stragglers by hand.
Pest and disease control
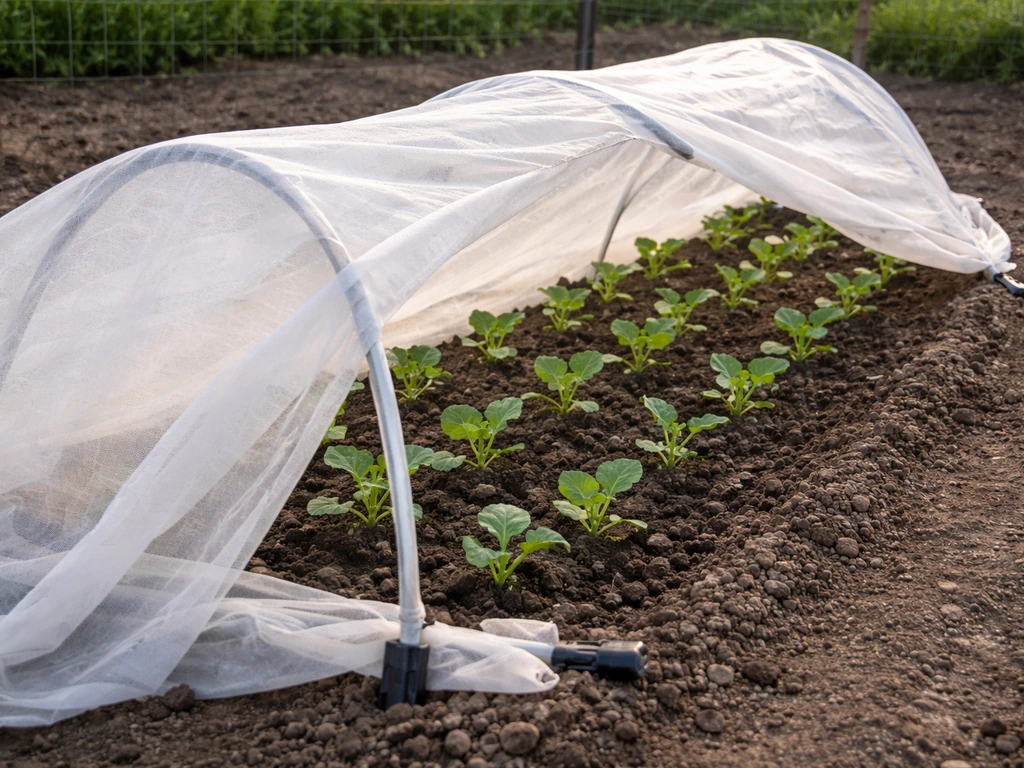
Start with physical barriers. Row cover placed at transplant time prevents most insect pressure on brassicas and carrots before it starts. Check under leaves regularly, especially for aphids and caterpillars. Remove by hand or use a strong spray of water for small infestations. Crop rotation is your best disease prevention tool: most soil-borne diseases cannot survive without their host plant family, so rotating beds breaks the cycle.
- Use row cover (like Agribon) at planting time to block flying pests before they establish
- Hand-pick caterpillars and beetles; check in the early morning when they are slowest
- Spray aphid colonies off with water; a diluted neem oil solution handles persistent infestations
- Remove diseased plant material immediately; do not compost it unless your pile runs very hot
- Avoid overhead watering in the evening, which promotes fungal disease on foliage
- Keep paths clear of debris where slugs and earwigs hide during the day
Avoid tilling between crops to address problems. Tilling disrupts the fungal networks and soil structure you have been building. Surface cultivation and hand tools are the right approach in an established biointensive bed.
A practical starter plan and checklist
Ecology Action suggests a first garden starting at 100 square feet, which is one standard 5x20-foot bed. At that scale, you can practice every technique, grow a meaningful amount of food, and generate compost material without being overwhelmed. As you gain experience, you will be able to grow stuff you can use from those harvests, not just experiment with plants grow a meaningful amount of food. If 30 hours per week of labor on roughly 4,000 square feet of growing area can produce a complete diet for one person, a single 100-square-foot bed is realistically a supplemental food and learning project, which is exactly the right place to start.
First-season starter plan (one 100-square-foot bed)
- Mark your 5x20 foot bed and clear all vegetation from the surface.
- Test soil looseness to 24 inches. If compacted, double-dig following the trench method above.
- Apply 1 to 2 inches of finished compost across the surface and work it into the top 4 to 6 inches.
- Rake smooth and let settle for 2 to 3 days before planting.
- Plant your first crops using hexagonal offset spacing: try a mix of fast crops (radishes, lettuce, spinach) and one slower anchor crop (beets, kale, or carrots).
- Set up your first compost pile alongside the bed using garden trimmings, kitchen scraps, and any carbon material available (straw, dried leaves, cardboard).
- Water in new transplants or seeds deeply at planting, then monitor and water when the top inch of soil dries out.
- Hand-weed for the first 2 to 3 weeks until canopy closes.
- Harvest outer leaves continuously on greens to extend the season.
- After harvest, turn compost, top-dress bed with finished compost, and plan the next succession crop.
Biointensive setup checklist
- Bed staked and marked at 5 feet wide
- Soil tested for looseness to 24 inches; double-digged if compacted
- Finished compost sourced and applied at 1 to 2 inches per bed
- Crops chosen across at least two categories (greens plus root or calorie crop)
- Hexagonal spacing planned on paper before planting
- Compost pile started (minimum 3x3x3 feet for heat retention)
- Watering method in place (drip, wand, or slow hand-watering routine)
- Rotation plan mapped across beds if you have more than one
- Row cover or pest barrier ready for brassicas and carrot beds
- Records started (planting dates, varieties, spacing, and first harvest notes)
Scaling up from one bed
Once your first bed is running and you understand the rhythm, add beds one at a time. Each new bed ideally adds a different crop category: if your first bed is greens and roots, your second might be a calorie crop like dry beans or potatoes, and your third should include a dedicated carbon crop like corn or sunflowers for your compost pile. The system becomes meaningfully self-sustaining when you have enough carbon-crop area to feed your compost pile through the season, which is why the 60% carbon-crop guideline exists. You do not have to hit that ratio immediately, but keep it as your target as you grow.
Common mistakes to avoid: walking on beds after preparation, applying unfinished compost (it can burn plants and tie up nitrogen), spacing plants as if they are in regular row-garden conditions (too wide), and neglecting the compost pile when things get busy. The pile and the bed are one system. Let either one slide and the other suffers.
Keep records from the start. Even simple notes on planting date, variety, spacing used, and first harvest date will teach you more in one season than a month of reading. The biointensive method rewards observation, and your own garden data is ultimately more useful than any general guideline.
FAQ
What’s the fastest way to tell if my soil is already loose enough to skip double-digging for the grow biointensive method?
Use the rod test again after a heavy mulch year (or after you harvest and avoid foot traffic). If the tool still only penetrates 6 to 8 inches with firm resistance, plan to double-dig, because close hex spacing depends on that deeper aerated structure. If you can reach about 24 inches with reasonable effort, focus on surface prep plus compost layering.
How do I know whether my compost is “finished” enough for biointensive beds?
Finished compost should be dark and crumbly with an earthy smell (not sour, ammonia-like, or actively hot). If you apply before it cools down and stabilizes, it can tie up nitrogen or create conditions that slow root growth, especially when plants are packed tightly.
Can I use leaf mold or kitchen scraps as the compost carbon source in the grow biointensive method?
You can add them, but don’t rely on them as your main carbon. Leaf mold and most “brown” materials are carbon-rich, while kitchen scraps are nitrogen-rich, and the method works best when you consistently build a carbon-to-nitrogen balance around the target range. A practical approach is to treat straw or wood-chip-based browns as your default carbon, then blend in greens as you collect them.
How strict do I need to be with the carbon-crop percentage when I’m starting the grow biointensive method?
You don’t have to hit 60% immediately, but you do need a plan to grow enough compost feedstocks over time. If you keep adding beds without dedicating space for carbon crops, you’ll eventually run compost short and the system will stall. A simple rule is to scale your carbon area in step with your compost demand each season.
Is hexagonal offset spacing really necessary, or can I use simple rows for the grow biointensive method?
Rows can work as a temporary training wheels approach, but you’ll lose some of the “each plant gets similar root space” benefit. The method’s advantage depends on canopy closure and uniform packing, which is harder to achieve with straight rows. If you do use rows, still aim for the same center-to-center distances the guide calls out for each crop.
What if my beds get compacted even though I’m not walking on them, what should I do?
Check for hidden compaction from wheelbarrows, hoses dragged across the bed, or power equipment. If the soil surface crusts or your rod test drops again, loosen only the surface and re-apply compost rather than re-running full double-digging every time. Prevent repeat compaction by keeping tools and access on paths, not beds.
How should I handle watering if I’m using the grow biointensive method but don’t have drip irrigation?
You can still do it well with a wand or slow hand-watering, deliver water at soil level if possible, and water deeply less often rather than frequent light bursts. Deep watering encourages roots to follow moisture into the loose, prepared zone you built. Also watch for dry spots between plants, because close spacing can hide uneven irrigation.
What’s the right way to use row cover in the grow biointensive method without accidentally harming crops?
Install it at the vulnerable stage (transplant time for many pests) and monitor under the fabric, because many insects stay on the underside. When hand-watering, confirm the fabric weight you bought will allow water through; if it won’t, lift edges or water before covering to prevent missed irrigation.
Do I need to rotate crop families every year with the grow biointensive method if beds are only 100 square feet?
Yes, rotation is especially important when plants are close and disease pressure can spread quickly. Even with limited space, rotate by the broad categories described in the article (roots, legumes, brassicas, fruiting crops) by moving each category forward one bed each season. If you can’t rotate fully, at least avoid repeating the same family in the same bed for consecutive seasons.
How do I manage weeds during the first weeks after planting in the grow biointensive method?
Plan for the “gap period,” the first two to three weeks before canopy closure. Do shallow weeding (hoe or similar hand tool) that only skims the surface, because stirring deeper layers can bring weed seeds up. Once plants spread and touch, switch to spot-pulling only.
What should I do if pests suddenly appear in my grow biointensive beds, should I spray right away?
Start by checking under leaves and targeting the specific problem, aphids and caterpillars behave very differently. For small infestations, water-spray or hand removal can be enough. Use stronger interventions early only if you’re seeing fast population growth, because close spacing lets issues expand quickly.
Is it a mistake to till between crop cycles in a grow biointensive bed?
For the system, yes, tilling undermines the soil structure and fungal networks you’re trying to build. If you need to reset beds between crops, use surface cultivation or hand tools instead, then return to compost top-dressing for fertility and soil rebuilding.
How much labor and record-keeping do I need to make the grow biointensive method work for me?
At minimum, track planting date, variety, and the actual spacing you used, plus the first harvest date and any problems you saw. Close spacing and succession planting mean outcomes shift quickly based on timing. Simple notes help you spot patterns like which crops respond best to your compost quality and watering schedule.
My first bed is producing, can I still treat it like an experiment, or do I have to commit fully to the grow biointensive method right away?
You should commit to the core system parts, especially compost reliability and no-bed-walking rules, because those determine whether the soil stays vigorous. You can experiment with crop variety, succession timing, and cover strategy, but avoid changing everything at once. Keep one variable per season so you learn faster.
Next Article
Grow Better Cow Manure: Safe Prep and Application Guide
Learn safe ways to grow better cow manure: prep, compost or cure, apply to beds and containers, avoid burns and weeds.