Any piece of ground that gets at least 6 hours of direct sun, drains reasonably well, has workable soil, and sits close enough to a water source is farmland you can use to grow crops. Using land to grow food crops is an example of farming that can work when the site has enough sun, workable soil, and access to water. That is the real baseline. You do not need perfect loam, a flat field, or a tractor.
Farmland That Can Be Used to Grow Crops: How to Start

Marcus Hendrick
27 Apr 2026
What you need is an honest assessment of what you have, a plan to fix what is lacking, and the willingness to build soil over time. This guide walks you through every step: evaluating your land today, improving the soil, planning what to grow, managing water, and budgeting the whole thing realistically.
What 'Usable Farmland' Actually Means for a Home Grower
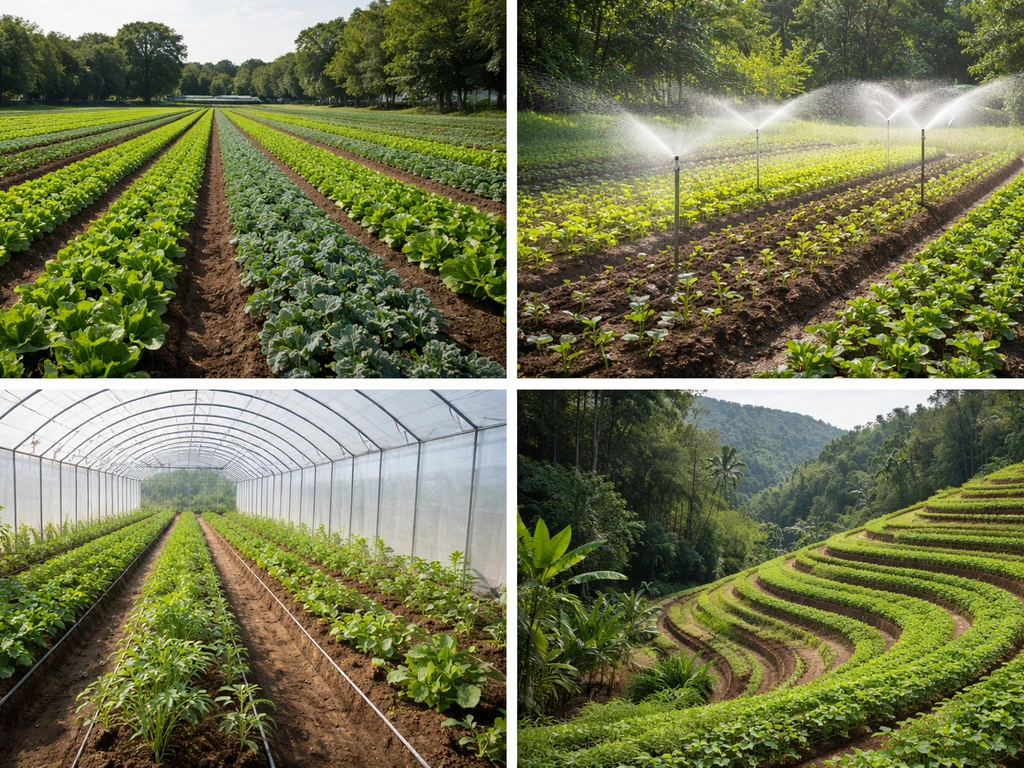
Usable farmland is not a legal designation or a minimum acreage. At the home-growing scale, it means land that can reliably support a productive planting season with reasonable inputs of time and money. The four things that define usability are size, soil, access, and purpose.
Size is relative to your goals. A 100-square-foot raised bed can supply a family with salad greens and herbs for months. A 1,000-square-foot in-ground plot can produce a meaningful share of your annual vegetable supply. Yields from a 100-foot row of tomatoes, for example, can run 100 pounds or more depending on variety and care. You do not need acreage to be productive, but you do need enough space to rotate crops, which usually means planning for at least two or three distinct growing areas.
Soil is the engine. Good farmland has topsoil that is loose enough for roots to penetrate, holds moisture without becoming waterlogged, and contains enough organic matter and nutrients to feed plants without constant fertilizer inputs. Most land you encounter does not start this way, especially in suburban or urban lots, but that is fixable.
Access means two things: physical access to work the land and access to water. If you cannot get a hose or irrigation line to a plot, growing crops there gets very hard very quickly. Sun access matters too. Even the best soil is mostly wasted if a building or tree line blocks direct light for more than half the day.
Purpose shapes every other decision. Are you growing vegetables for fresh eating, preserving, or both? Are you trying to cover a significant share of your household food needs, or supplementing what you buy? Clarity on purpose determines how intensively you need to develop the land and which crops are worth prioritizing. Cover crops, for instance, may be part of your cropping plan not for food but for building the soil itself, which is a form of investment in next year's productivity.
How to Evaluate Land Before You Spend a Dollar on It
Before you buy amendments, build beds, or plant anything, spend a few hours actually assessing the land. This evaluation costs almost nothing and saves you from expensive mistakes. Work through these factors in order.
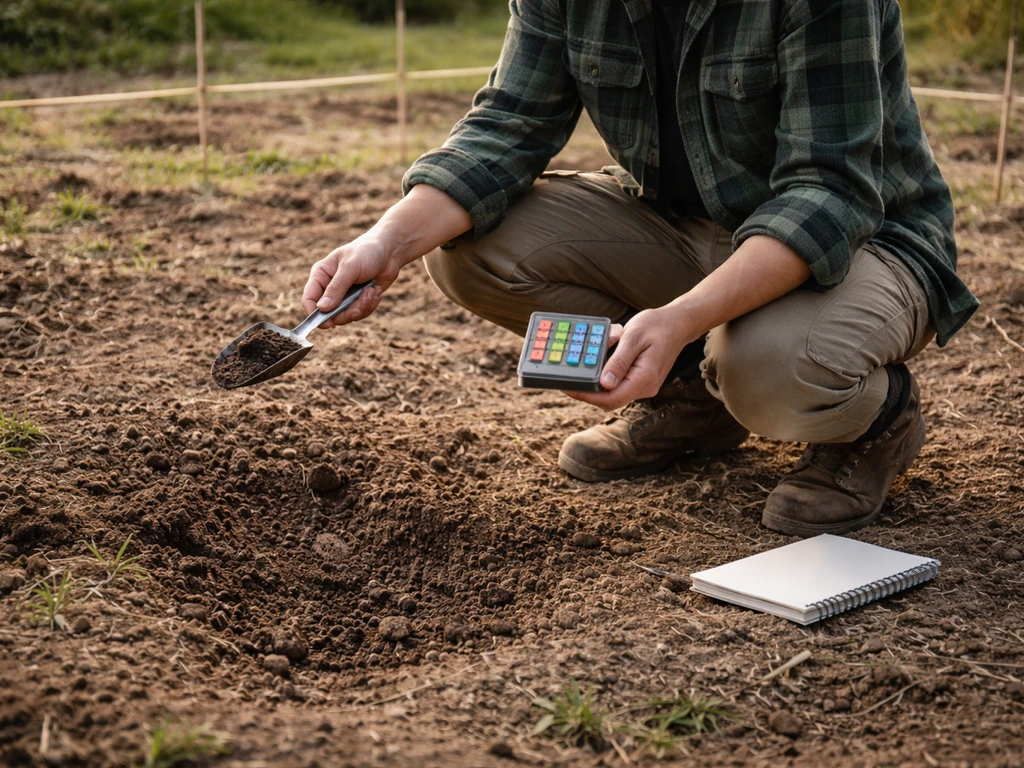
Start With a Soil Test
A standard soil test from your state extension service or a certified lab costs roughly $15 to $30 and gives you pH, phosphorus, potassium, magnesium, calcium, and often organic matter and cation exchange capacity (CEC). CEC tells you how well your soil holds onto nutrients: it generally increases with higher clay content and higher organic matter. A low CEC means nutrients leach out faster, which affects how and when you fertilize. Collect samples from several spots across the plot, mix them together, and send one composite sample. The lab report will include specific amendment recommendations, not just raw numbers.
The most important number is pH. Cornell Cooperative Extension notes that [soil pH has a neutral point at 7. 0](https://washington. cce.
cornell. edu/horticulture-gardening/soil-ph-importance-testing-sampling) and discusses when to retest after changes. Most vegetables grow best between pH 6. 0 and 7.
0. If the test comes back with a lime recommendation, apply it about two months before adding any fertilizer so the liming material has time to actually raise the pH before nutrients go in. If pH is already in range, shift your focus to any nutrients rated low on the report. To lower pH (for blueberries, potatoes, or naturally alkaline ground), use elemental sulfur products like granular sulfur or iron sulfate.
The USDA's Web Soil Survey is also worth checking before you even collect a sample: it can flag known soil limitations like erosion risk, seasonal wetness, and drainage issues for your specific location. USDA NRCS notes that Web Soil Survey can be used to examine mapped soil properties and limitations for a specific location, including drainage and seasonal wetness [Web Soil Survey to examine mapped soil properties and limitations](https://www. nrcs. usda.
gov/resources/data-and-reports/web-soil-survey).
Check Drainage and Compaction
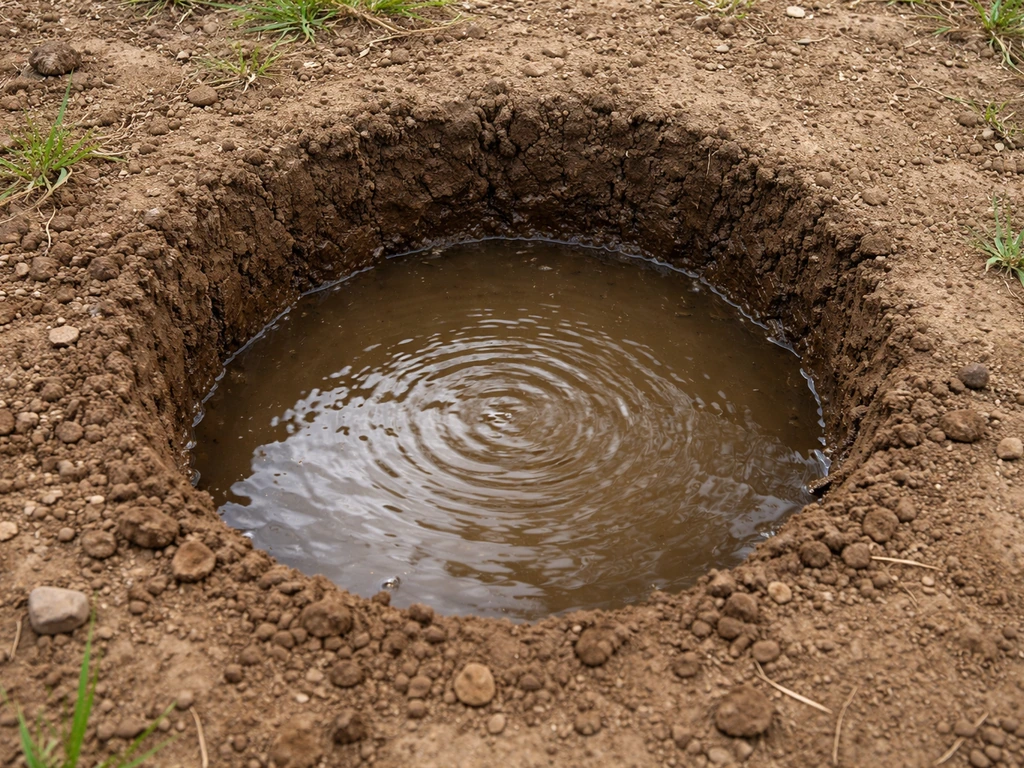
Dig a hole about 12 inches deep and fill it with water. If the water drains in under an hour, drainage is fine. If it sits for several hours or overnight, you have a drainage problem that will drown roots during wet spells. Separately, use a penetrometer (a simple tool available from extension suppliers for around $30 to $50) to check for compaction. Push it straight into the soil: resistance above about 300 psi at 6 to 8 inches deep signals compaction that will visibly slow root growth and reduce the soil's ability to hold and drain water properly. Compacted soils are fixable, but it takes a season or two of consistent work.
Assess Sunlight and Exposure
Visit the plot at three points during the day: mid-morning, noon, and mid-afternoon. Note any shade from trees, buildings, or fencing. Six hours of direct sun is the minimum for most fruiting vegetables (tomatoes, peppers, squash, beans). Leafy greens and root vegetables can often get by with four to five hours. If the site gets less than four hours, it is better suited to an herb patch or shade-tolerant perennials than to primary food production.
Look at Land History
If the land was previously an orchard, a painted structure, a gas station, or used for industrial purposes, test specifically for lead and arsenic contamination before growing food in it. Improved testing methods exist for both contaminants, and the cost is often under $50 from a certified lab. On highly erodible slopes or sites that have been disturbed by grading, the land may not be suitable for conventional row cropping without significant terracing or erosion controls. In those cases, raised beds or permanent vegetative cover on the most at-risk areas is the practical answer.
Preparing and Improving Soil So It Actually Grows Food
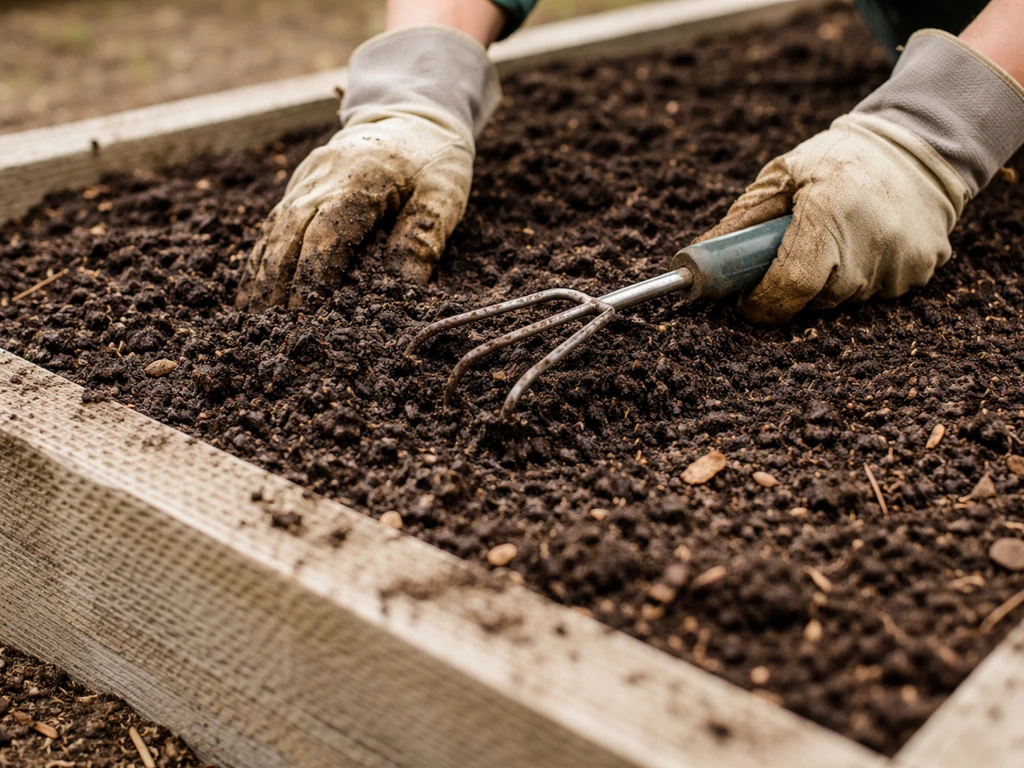
Once you know what you are working with, you can fix it. Soil improvement is not glamorous work but it is the single highest-return investment you make in any growing operation. The goal is to build organic matter, improve structure, and hit the right fertility and pH before the first seed goes in.
Build Organic Matter First
Compost is the foundation. Spread 2 to 4 inches of finished compost over the bed and work it into the top 8 to 10 inches of soil before planting. If you are dealing with truly poor or compacted ground, combine compost with a broadfork pass: push the tines in deep, rock the fork back slightly, and move across the bed without fully inverting the soil. This loosens compaction, improves air and water movement, and preserves soil structure better than repeated rototilling. Frequent tillage, especially with heavy equipment, can actually break down structure over time and make compaction worse.
Amend Based on Your Test Results
Follow the lab's recommendations, not generic advice. Common scenarios and their fixes are listed below.
| Soil Problem | Recommended Amendment | Notes |
|---|---|---|
| Low pH (too acidic) | Agricultural lime (calcitic or dolomitic) | Apply 2 months before fertilizer; retest after one season |
| High pH (too alkaline) | Elemental sulfur or iron sulfate | Works slowly; results take weeks to months |
| Low phosphorus | Bone meal or rock phosphate | Incorporate into root zone, not surface applied |
| Low potassium | Greensand, wood ash, or potassium sulfate | Ash raises pH slightly; avoid overuse |
| Low calcium (sodic soil) | Gypsum (calcium sulfate) | Also supplies sulfur; best for sodic/high-sodium soils |
| Low organic matter | Compost, aged manure, old hay | Target 5%+ OM for most vegetable production |
| Compaction | Broadfork, cover crops, reduced tillage | Takes 1 to 3 seasons to fully resolve deep compaction |
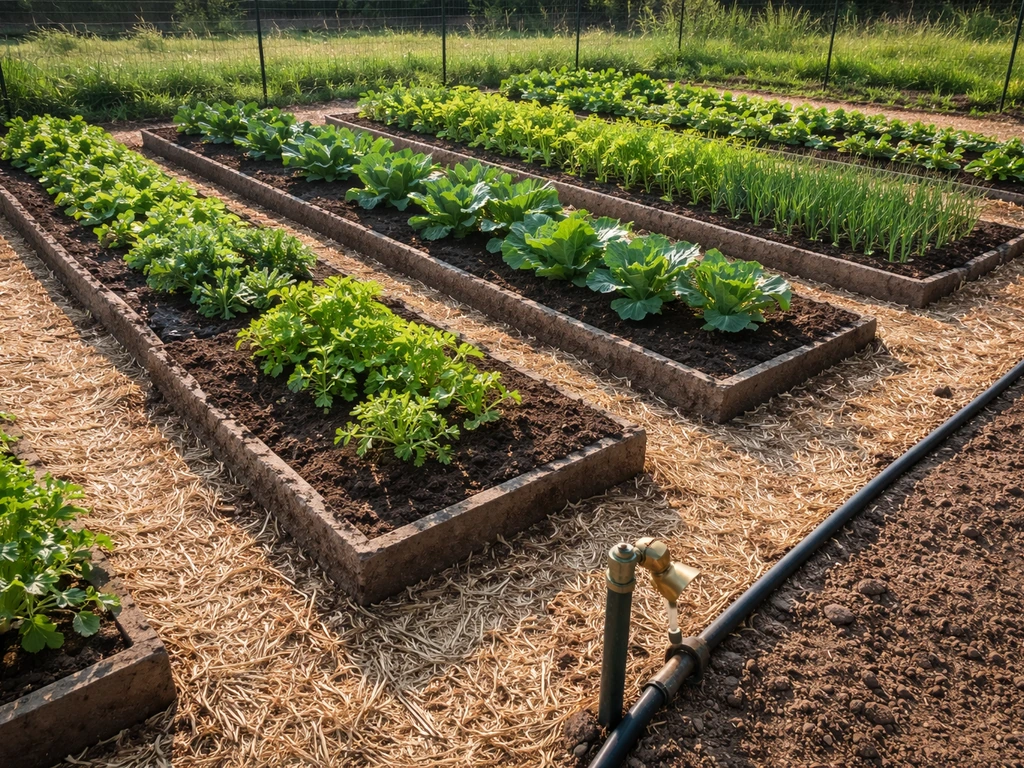
When the Native Soil Is Too Far Gone: Raised Beds
If drainage is terrible, contamination is a concern, or the native soil is hardpan clay with almost no organic matter, raised beds are the most practical solution. You can build beds directly over existing ground: roots will eventually grow down into the native soil below, which helps over time. Fill beds with a mix of quality topsoil and compost, aiming for at least 10 to 12 inches of growing medium.
Where native soil is merely poor (not contaminated), one approach is to excavate a few inches, layer in organic matter like aged manure or old hay, and mix it into the existing soil before topping off with fresh compost. Farmers may also use manure or animal-based inputs when planning soil fertility, so it helps to understand how those choices fit with plant-growing practices.
Mayan farmers also relied on practical soil fertility tools and techniques that helped them grow reliable crops in their local environment what tools did mayan farmers use to grow their crops. Early humans gradually figured out the right ways to plant and care for crops through observation and repeated experience how did humans learn to grow crops. Farmers also grow crops by using soil-building practices, like planning fertility inputs based on what their land needs manure or animal-based inputs.
Avoid standing or kneeling in the beds themselves: use permanent pathways around each bed to prevent re-compacting the soil you just worked to improve.
Cover Crops as a Year-Round Improvement Tool
Cover crops are one of the most underused tools in home food gardens. Planted in fall after harvest or in any gap between cash crops, they reduce winter erosion, suppress weeds, add organic matter when turned under in spring, and in the case of legumes like clover or field peas, fix atmospheric nitrogen into the soil.
The practical approach is to plant into weed-free, moist soil with good seed-to-soil contact after your main harvest, then terminate (by mowing and incorporating, or tarping) about two to three weeks before your next planting. Talking to your local extension office or NRCS office about the right cover crop species for your region and vegetable system is worth the 20-minute phone call.
The choices are different in the Southeast versus the Upper Midwest, and getting it wrong means a cover crop that either winter-kills too early or grows so aggressively it delays your spring planting.
Designing a Cropping Plan That Works All Season
A good cropping plan is not just a list of what you want to grow. It accounts for spacing, timing, succession, and rotation across multiple growing seasons. Getting this right from the start prevents the two most common home-garden failures: planting too much of one thing at once and burning out the same soil with the same crop every year.
Match Crops to Your Actual Conditions
Start with what grows well in your climate zone, not what looks good in a seed catalog. Your cooperative extension office publishes planting charts by crop that include seeding depth, spacing, and recommended planting dates for your region. A 100-foot row of tomatoes might be right for zone 7 but pointless in a zone 3 summer that lasts 90 days. In short seasons, prioritize fast-maturing crops: radishes (25 days), lettuce (45 to 60 days), bush beans (50 to 55 days), and brassicas started indoors 6 to 8 weeks before transplanting. In longer seasons, you can afford to include slow-but-high-yield crops like winter squash, sweet corn, or dry beans.
Space and Yield Realities
Use per-100-foot-row yield benchmarks to work backward from your household needs. If your family uses about 50 pounds of tomatoes for fresh eating and canning each season, a single 50-foot row of a productive variety should get you there in a good year. Scale every number proportionally: a 50-foot row yields about half what a 100-foot row does. Some reliable per-100-foot-row yield targets to plan around: beans (bush) around 60 pounds, cucumbers around 120 pounds, sweet corn around 10 dozen ears, summer squash around 150 pounds, and leaf lettuce around 50 pounds. These are averages under decent conditions, not guarantees.
Rotation Is Not Optional
Crop rotation is how you keep soil disease and pest pressure from compounding year after year. Many of the same ideas also explain how animals, like grazing livestock or soil organisms, can support healthier soils for better crop yields over time crop rotation. The basic rule is to avoid planting the same plant family in the same spot more than once every three to four years.
Group crops by family: nightshades (tomatoes, peppers, eggplant, potatoes), brassicas (cabbage, broccoli, kale, turnips), cucurbits (squash, cucumbers, melons), and legumes (beans, peas). Rotate these groups through your beds in sequence. Legumes are valuable not just as food but as a rotation tool because they leave behind residual nitrogen for the next crop.
Understanding why farmers grow cover crops and rotate families is directly tied to managing soil health over time, which is what separates a one-season garden from farmland that keeps producing.
Succession Planting Extends Your Season
Instead of planting all your lettuce at once and getting swamped with it in June, plant one-third of your planned row every two to three weeks. This spreads harvest across the season and keeps fresh food coming rather than a single glut. The same logic applies to carrots, beets, and bush beans. Keep a simple written calendar with planned planting dates and expected harvest windows for each bed. It takes 20 minutes to set up at the start of the season and prevents a lot of wasted seed and forgotten timing.
Water: Getting It to Your Crops Reliably
Water is the most common limiting factor on otherwise-capable land. Most vegetables need about 1 to 1.5 inches of water per week during the growing season. When rain does not supply that, you need to. How you deliver that water matters a lot for both plant health and your time.
Irrigation Options Compared

| Method | Best For | Approximate Cost | Water Efficiency | Labor |
|---|---|---|---|---|
| Hand watering (hose/can) | Small beds, spot watering | Almost nothing | Low (evaporation, runoff) | High daily time |
| Soaker hose | Row gardens, small plots | $20 to $60 for a basic setup | Moderate | Low once set up |
| Drip irrigation | Raised beds, larger plots | $50 to $200+ depending on scale | High (delivers at root zone) | Low; check emitters weekly |
| Sprinkler | Large open ground | $30 to $100+ | Moderate to low (wind losses, wet foliage) | Moderate |
| Rain catchment (barrel) | Supplemental supply | $50 to $150 per barrel | Depends on rainfall | Manual hauling or gravity feed |
Drip irrigation is the best choice for most home food gardens because it delivers water directly to the root zone, reduces fungal disease from wet foliage, and can be scheduled or automated. A simple drip setup for a 200-square-foot raised-bed garden can be assembled for under $100 in parts. For larger in-ground plots, soaker hose is a cost-effective middle ground. Pair a 3-inch layer of mulch over any irrigated planting: mulch significantly reduces surface evaporation, prevents soil crusting, keeps roots cooler in summer, and reduces how often you need to water. That is not a minor benefit: in hot climates, mulching alone can cut irrigation demand by 25 to 50 percent.
Knowing When to Water
The simplest diagnostic is to stick your finger or a thin trowel 2 to 3 inches into the soil near the root zone. If it comes out dry and crumbly, water now. If it is still moist and holds together slightly, wait another day. More sophisticated growers use evapotranspiration (ET) data, which estimates how much water the crop and local weather conditions are pulling from the soil each day.
Your local extension service often publishes weekly ET estimates by crop, which can help you schedule irrigation without guessing. For drip systems with low pressure, you may need to project a moisture deficit over a few days and start irrigating before the soil fully dries out, since low-flow emitters take time to recharge the root zone.
Managing Runoff and Erosion
On sloped ground, water management means keeping water on the land long enough for it to infiltrate rather than run off and carry topsoil with it. Mulching beds on any slope above about 3 to 5 percent grade helps considerably. On steeper slopes, consider terracing with simple wooden retaining boards or building contour beds that run across the slope rather than up and down it. On ground so erodible that normal growing conditions cannot stabilize it, permanent vegetative cover (perennial grass, clover, or native plants) may be the right call for portions of the site, with food production concentrated in the less vulnerable areas.
Budgeting, Yields, and Managing Real Risk
Getting into food production without a realistic cost picture leads to disappointment. The good news is that the startup costs are manageable and ongoing costs drop significantly after the first season once soil is built and infrastructure is in place.
Realistic Startup Costs
These are ballpark numbers based on a first-time setup for a 200 to 400-square-foot productive garden (roughly two to four 4x8 raised beds or a comparable in-ground plot). Actual costs vary by region and whether you source compost yourself.
- Soil test: $15 to $30
- Soil amendments (lime, sulfur, phosphorus, compost depending on test results): $30 to $80
- Raised bed materials (lumber or composite, if using raised beds): $50 to $150 per bed
- Quality topsoil or compost fill for raised beds: $40 to $100 depending on quantity and local pricing
- Seeds and transplants for one season: $30 to $75
- Basic tools (broadfork, hoe, trowel, watering can or hose): $50 to $120 if buying new
- Simple drip or soaker hose irrigation: $40 to $100
- Mulch (straw, wood chips, or similar): $10 to $30 for a small plot
- Row covers for pest and frost protection: $20 to $50
A bare-minimum first-season setup for a beginner with no tools and using raised beds runs roughly $200 to $400. An in-ground plot on existing native soil with good drainage and decent organic matter can be started for $100 to $150 if you already own basic tools. Fertilizer inputs for in-ground production are modest: a common guideline is applying 1 to 2 pounds of a balanced or starter fertilizer per 100-foot row, adjusted by your soil test results.
What You Can Realistically Harvest
A well-managed 200-square-foot garden in a five-month growing season can realistically produce $300 to $600 worth of vegetables at retail prices, depending on what you grow and how intensively you succession-plant. High-value crops like tomatoes, peppers, salad greens, and herbs give the best return per square foot. Staple crops like corn, potatoes, and winter squash need more space for the same dollar value but matter more if food security and caloric supply are your goal. The first season is usually the least productive as you are still learning the land and building soil. By season two or three, yields typically improve noticeably as organic matter accumulates and you understand the site's quirks.
Pests, Weather, and What to Do When Things Go Wrong
No growing season goes exactly to plan. The goal of risk management is to reduce how bad a bad year gets, not to eliminate all problems. Start with integrated pest management (IPM): use physical barriers before chemical controls. Farmers do sometimes kill animals in the process of farming, but whether it is necessary depends on the pest, the control method, and the specific crop and location pest control.
Row covers made from lightweight floating fabric are one of the most effective tools available. They exclude insects, birds, and small mammals from host plants, and they also provide a few degrees of frost protection. They are especially useful early in the season when transplants are most vulnerable. Remove covers when plants begin to flower if pollination is needed.
Stem collars pushed into the soil around transplants prevent cutworm damage, which can wipe out an entire new planting overnight.
Weather risk is harder to control, but a few practices help. Mulching buffers soil temperature and moisture during heat events and dry spells. Having a few extra transplants started in pots as backup gives you replanting options if an early frost or pest event takes out a bed. Diversify what you grow: planting six different crops means a failure in one does not collapse the whole season. If a specific crop consistently fails in your conditions, stop growing it and redirect that space to something that works. Learning what your land and climate support well is a process that takes a few seasons, and that is normal.
When the Land Is Not Perfect (Which Is Most of the Time)
Imperfect land is the normal starting point, not the exception. Compacted soil improves with broadforking, cover cropping, and reduced tillage over one to three seasons. Poor drainage can be managed with raised beds or by creating simple surface channels to redirect water away from planting areas. Low organic matter is directly fixable with compost additions every season.
Contaminated soil (lead, arsenic) can often be managed by switching entirely to raised beds with clean fill, which isolates crops from the native soil. pH problems respond predictably to the right amendments. The only land that is genuinely not workable for food crops is ground that is permanently waterlogged, receives fewer than four hours of sun, or is heavily contaminated in a way that raised beds cannot address practically. Everything else is a starting point.
Your Pre-Season Checklist
Use this as your go-to reference before committing time and money to any piece of ground.
- Check sunlight at the site at three times of day and confirm at least 6 hours of direct sun for fruiting crops (4 hours minimum for greens and roots)
- Run a standard soil test through your state extension service and read the full report, not just the pH number
- Do a drainage test: fill a 12-inch hole with water and time how fast it drains
- Use a penetrometer or probe the soil with a screwdriver to check for subsurface compaction
- Research land history (previous use, structures, orchard chemicals) and add a lead/arsenic test if anything is questionable
- Check the USDA Web Soil Survey for your parcel to flag known drainage, erosion, or wetness limitations
- Apply lime if recommended, and wait 6 to 8 weeks before adding fertilizer
- Incorporate 2 to 4 inches of compost and broadfork or till shallowly to break compaction
- Design your crop layout around rotation groups and succession planting windows using extension planting charts for your region
- Set up irrigation before planting, not after; even a simple soaker hose laid before transplanting saves water and time
- Mulch all planted beds with 2 to 3 inches of straw or similar material immediately after planting
- Have row covers and stem collars on hand before your first transplants go in
FAQ
What if the property gets less than 6 hours of sun, can it still be farmland that can be used to grow crops?
If the site only gets about 4 hours of sun, you can still grow some food, but prioritize crops that tolerate shade (leafy greens, many herbs, and some roots) and plan for slower growth. Fruiting crops like tomatoes, peppers, and squash usually need closer to the 6+ hour baseline, so expect much smaller yields unless you improve light (for example, removing heavy shade or relocating beds).
Do I need the soil to already be good, or can farmland still be usable if it needs improvement?
Yes, but the definition changes. Land can be usable if it drains well enough for a reliable planting window and you can bring water to the plot, even if the soil is not immediately “ready” for crops. The key is your fix plan, for instance adding compost and using raised beds to compensate for poor structure or fertility instead of assuming you can farm it as-is.
Can I skip a soil test and just start with compost and fertilizer?
Do a soil test before you add anything, especially if you suspect contamination or nutrient imbalance. Fertilizer can mask problems, but pH errors and toxic contaminants do not go away with “more feed.” If you are planning raised beds over existing ground, test the native soil anyway to decide whether you can safely mix compost only or should isolate with clean fill and a barrier.
If the land tests “a little” contaminated, is adding compost enough?
Not for food safety, and usually not for long-term productivity. Worms and compost help, but they do not correct heavy metals or persistent contamination risk. If lead or arsenic are a concern, switching to raised beds with clean imported growing media is often the practical solution, but you still want lab results to confirm the approach and the depth/isolation you need.
If water is available nearby, what else should I check to ensure the land can reliably support crops?
Water can make a plot usable even when rainfall is inconsistent, but you need reliable access and delivery capacity. If you are relying on a hose, check whether you can reach every bed without constant dragging, leaks, or low pressure that limits irrigation timing. For drip, plan for filter needs and emitter clogging, and size your system so it can deliver the weekly target during dry spells.
How can I tell if poor drainage will ruin my growing season?
A site can look fine visually and still fail under wet conditions. The hole-drain check is a strong start, but also observe how the area behaves after a rain, where puddles form, and whether water moves laterally toward beds. If water keeps pooling or flows across the plot, you may need surface channels or bed regrading before you can count on a productive season.
Is one soil compaction check enough, and what should I do if compaction varies across the plot?
Compaction is often site-specific and can vary across the same yard. Instead of one penetrometer reading, take several measurements at representative spots, especially where you plan to place beds. Even if the average is “okay,” localized hard layers might require targeted broadforking or using raised beds to bypass the compacted zone.
If I only have room for one small area, how do I manage crop rotation?
Yes, and it is usually worth it to plan for at least two or three separate growing areas so you can rotate plant families. If space is limited to one bed, you can still rotate using temporary containers or a second short-term area (like a hoop-house pot space) so you are not planting the same family in the same soil every year.
How do I avoid succession planting that creates too much workload or too much glut?
For succession planting, timing matters more than effort. If you plant too frequently, seedlings can outgrow the plan before the previous harvest ends, and you end up with overlap and pest pressure. A practical approach is to base the next planting on your expected days-to-first-harvest plus a buffer for weather, then scale down the row length if your season is short.
Does mulching always help with watering, and are there cases where it can make things worse?
Not always. Mulch reduces evaporation and can cut irrigation demand, but it can also slow soil warming in spring and keep roots cooler. If nights are cold, use lighter mulch or wait until soil warms, then switch to a deeper layer once you are past the early-season chill.
What should I prioritize if my growing season is unusually short?
Yes, if you match the crop plan to the climate and day length. In short seasons, focus on crops with quick maturity and plan to start some indoors earlier than you think, since setbacks are common. If your calendar cannot support that, choose shade-tolerant or long-lived perennials for most of the usable area and treat annuals as bonus crops.
What are common mistakes when using integrated pest management (IPM) at the home scale?
Yes. Start with physical barriers, then adjust based on what you see. Row covers are most effective early, but you must remove them when plants need pollination. Also plan for pests that can bypass barriers (like slugs under mulch or pests that feed after covers are removed), so you may need targeted tools like traps, hand removal, or habitat adjustments.
How do I build a more realistic budget beyond the first-season startup costs?
Budgeting should include “infrastructure” time and replacements. Hose connections, compost sourcing, filters for drip, mulch top-ups, and tools you did not plan for are recurring expenses. A realistic next step is to create a simple list of recurring items for each season, then add one buffer line item (often 10 to 20 percent) for unexpected needs.
Next Article
How Do Farmers Grow Food Around the World: Methods and Tips
Learn how farmers grow food worldwide: soil, water, crops, pests, harvest, and how to scale it for home gardens.