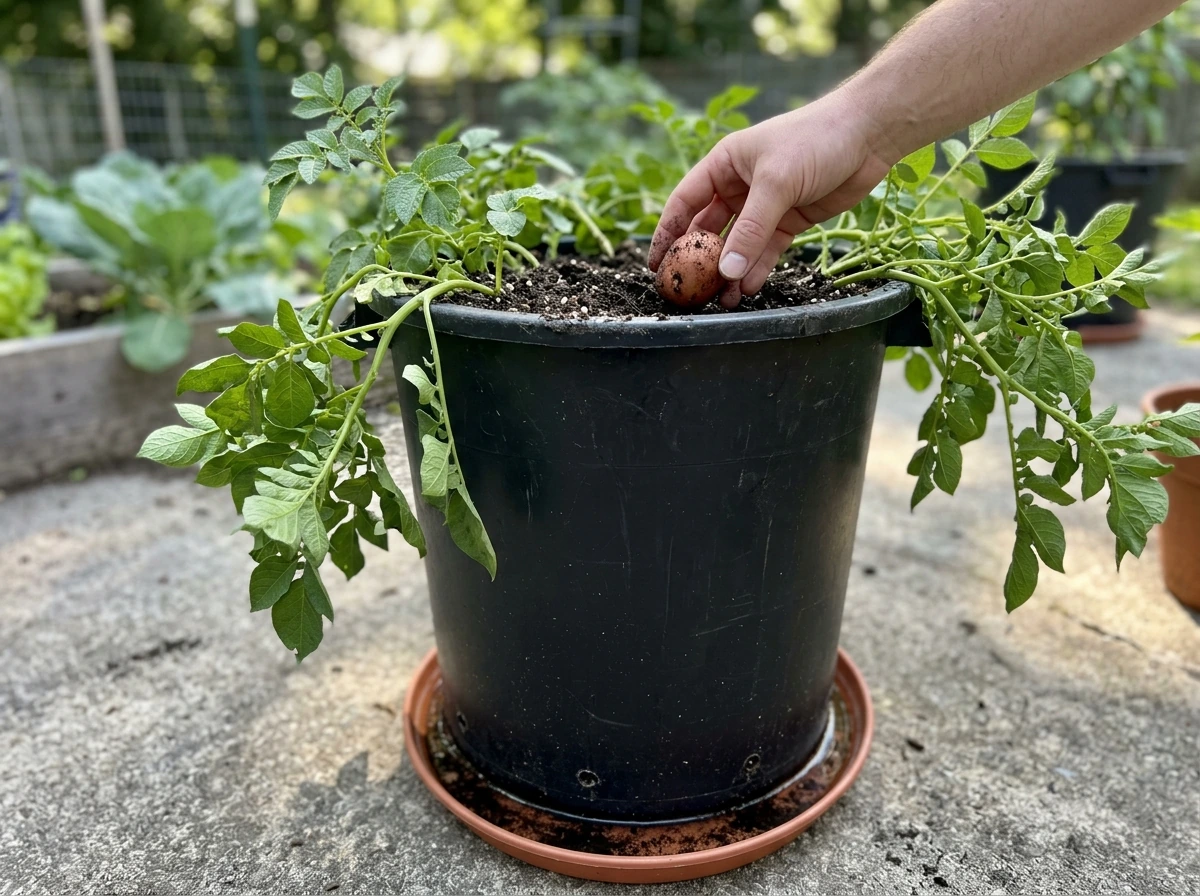
A standard 32-gallon plastic trash can gives you enough vertical depth to layer soil as the plants grow, which mimics the hilling process you'd do in a raised bed or in-ground garden. I've grown Yukon Golds and red fingerlings this way on a concrete patio with no garden bed in sight, and pulled out 15 to 20 pounds of potatoes from a single can at harvest.
It's not magic, it's just container gardening with a cheap, deep vessel that most people already own or can pick up for under $15. the martian can you grow potatoes
The key principles are the same as any potato growing method: The key principles are the same as any potato growing method: well-drained soil, adequate sunlight, consistent moisture, and enough loose growing medium for tubers to form. The trash can just happens to be an ideal shape for this. The trash can just happens to be an ideal shape for this. It's deep, it's cheap, it's portable, and you can drill your own drainage holes. If you've been skeptical because it sounds like a gardening gimmick, it isn't. University of Minnesota Extension confirms potatoes can thrive in home garden settings when those core conditions are met, and a properly set up trash can checks every box.
Choosing the right trash can and setting it up
The size of the container matters more than the material. Go with a 20- to 32-gallon trash can. Anything smaller limits the depth you need for layering, and depth is what drives yield in this method. A 32-gallon can is the sweet spot because it gives you 24 to 28 inches of growing depth, which is plenty of room for multiple layers of soil and a healthy root zone.
Material is where people overthink it. Standard black plastic trash cans work fine. Black plastic absorbs heat, which is actually helpful early in the season when you're trying to warm up the soil. In hotter climates or during summer heat waves, that same black surface can overheat the root zone and stress the plants, so in zones 8 and above, consider wrapping the outside with burlap or using a lighter-colored can if you're planting into warmer months to help protect the root zone
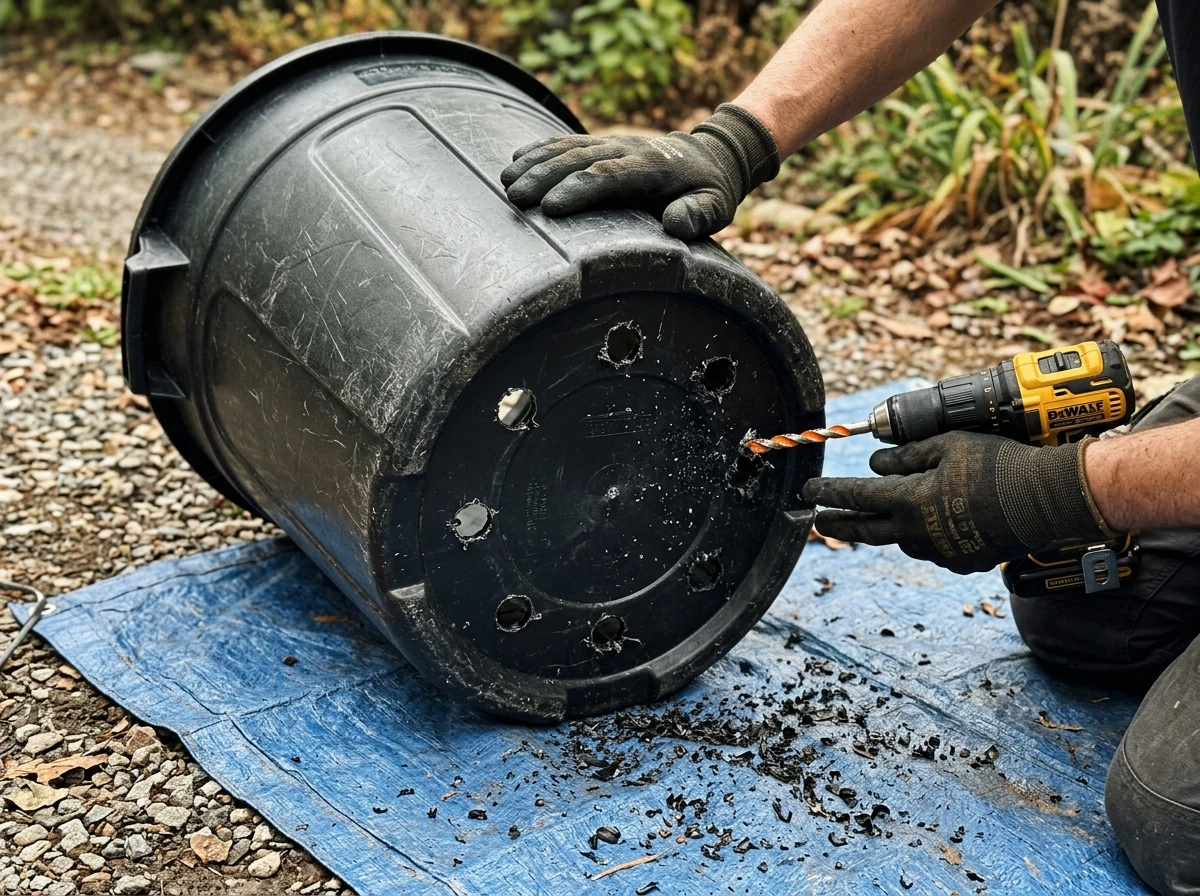
Drainage is non-negotiable. Waterlogged soil will rot your seed pieces and kill your plants. Drill 8 to 12 holes in the bottom of the can, each about half an inch in diameter. Space them evenly. Also drill 4 to 6 holes around the sides, about 4 inches up from the bottom, for additional drainage if you're in a rainy climate. Set the can on bricks, wooden blocks, or pot feet so water can actually escape instead of pooling under the can and backing up.
If you're using a metal garbage can, it will work but rusts out faster than plastic and can get very hot in direct sun. Line the inside with a burlap sack if you go this route, leaving the bottom open over your drainage holes. Avoid using plastic bags as a liner since they trap moisture against the soil and defeat the purpose of your drainage holes.
Seed potatoes and planting timing
Use certified seed potatoes, not grocery store potatoes. Grocery store potatoes are often treated with sprout inhibitors and may carry disease. Certified seed potatoes from a garden center or online supplier are inspected and disease-free, which gives you a real head start. Good varieties for containers include Yukon Gold, Red Norland, Kennebec, and fingerling types like Russian Banana. These tend to produce well in confined spaces. Larger, starchy baking varieties like Russets can still grow in a trash can, but they benefit most from the full 32-gallon depth.
If your seed potatoes are small (golf ball size or smaller), plant them whole. Larger ones can be cut into pieces, each with at least one or two eyes (the little buds where sprouts emerge). After cutting, let the cut pieces sit out at room temperature for 24 to 48 hours so the cut surface can callous over. This reduces the risk of rot after planting, especially important in the confined, moist environment inside a can.
Timing your planting right is critical. Potatoes are a cool-season crop, but they don't like a hard freeze. University of Maryland Extension specifically warns that hard frosts after planting cause seed pieces to languish or rot in the soil. Wait until your last frost date has passed and nighttime temperatures are consistently above 40°F. Soil temperature inside the can should be at least 45°F, and ideally 50 to 65°F, before you plant. The upside of a trash can is that you can move it. If a surprise frost is coming, wheel or carry your can into the garage overnight.
Soil mix, layering method, and how to hill inside a can
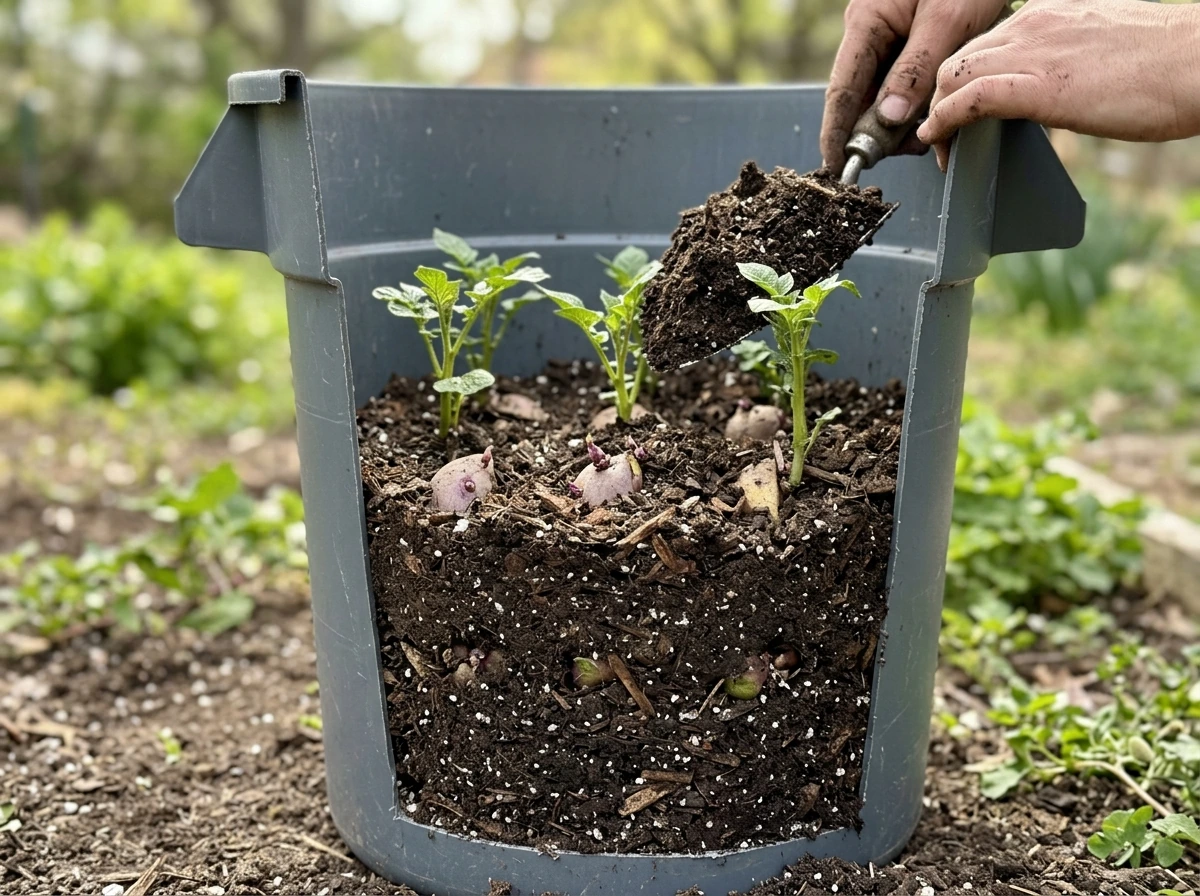
The soil mix you use directly affects how many potatoes you harvest. Potatoes need loose, airy, well-draining soil to form tubers. Dense garden soil compacts in a container and creates exactly the waterlogged, airless conditions that cause failure. Use a mix of about 60% quality potting mix, 30% compost, and 10% perlite or coarse sand. This blend drains freely, holds enough moisture between waterings, and provides the loose texture tubers need to expand.
Here is how the layering method works, step by step:
- Add 4 to 6 inches of your soil mix to the bottom of the can.
- Place 2 to 4 seed potato pieces on top of the soil, eyes facing up, spaced evenly and a few inches from the can walls.
- Cover with another 4 inches of soil mix.
- Water thoroughly until water drains freely from the bottom holes.
- As the sprouts grow to 6 to 8 inches above the soil surface, add another 3 to 4 inches of soil mix around the stems, leaving just the top few inches of foliage exposed. This is hilling.
- Repeat the hilling step every time the plants grow another 6 to 8 inches, until you've filled the can to within 4 to 6 inches of the top.
- Let the plants grow out fully from that final soil level.
The reason hilling works is that potatoes form on the underground portion of the stem, not just from the original seed piece. Every time you bury more stem, you're adding more real estate for tubers to form. In a trash can, you're doing this vertically instead of horizontally, which is exactly why the container method can yield so well relative to its footprint.
One common mistake is adding too much soil at once during hilling and smothering the plant. Always leave at least 3 to 4 inches of green foliage above the soil line. The plant needs those leaves to photosynthesize and keep growing. Bury the stem, not the plant.
Watering, sunlight, and feeding your container potatoes
Sunlight
Potatoes need full sun, which means at least 6 hours of direct sunlight per day, and 8 hours is better. One of the great advantages of a trash can is portability. If your patio has a spot that gets morning shade and afternoon sun, move the can to chase the best light. I've used this to my advantage when late-season heat was threatening to cook the soil. Move the can to a spot with afternoon shade and the plants stay productive longer.
Watering
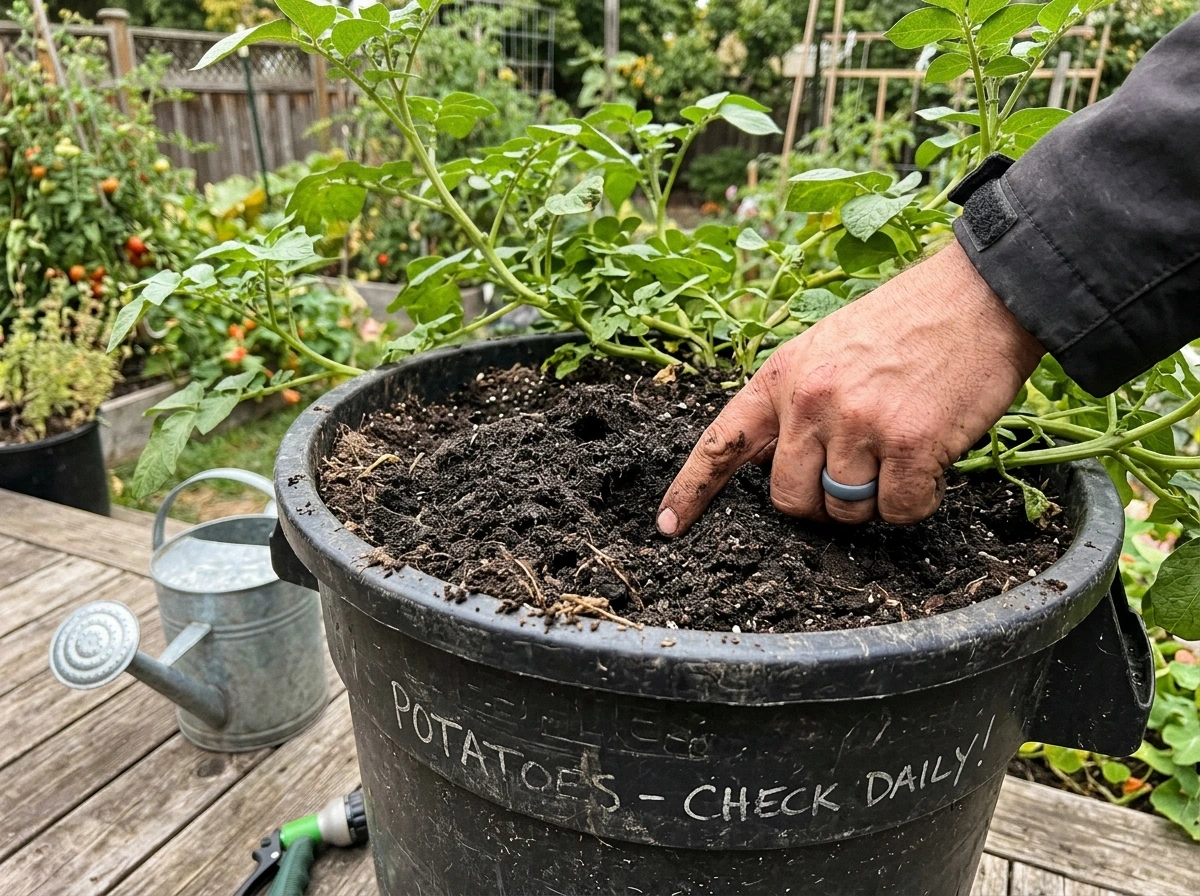
Containers dry out faster than in-ground beds, so you need to check moisture more frequently. The University of Minnesota Extension recommends soaking the soil thoroughly when you water, roughly once or twice a week. In a container, that means watering until you see steady drainage from the bottom holes. Then let the top inch or two of soil dry out before you water again. Stick your finger 2 inches into the soil: if it feels dry at that depth, it's time to water. If it still feels moist, wait another day.
Inconsistent watering, swinging between bone dry and soaking wet, causes a problem called hollow heart, where the interior of the potato develops a cavity. It can also cause knobby, misshapen tubers. Keep the moisture consistent, especially once the plants flower, which is when tubers are actively forming and most sensitive to stress.
Feeding
Potatoes are moderate feeders. A good compost-heavy soil mix provides a lot of what they need up front, but containerized plants will deplete nutrients faster than in-ground plants. Feed once every three to four weeks with a balanced, slow-release granular fertilizer (something like a 10-10-10 NPK), or use a liquid fertilizer diluted to half strength every two weeks. Once the plants start flowering, cut back on high-nitrogen fertilizers and switch to a formula with higher phosphorus and potassium, which supports tuber development rather than leafy growth.
Pests, disease, and the mistakes that kill container potatoes
Common pests
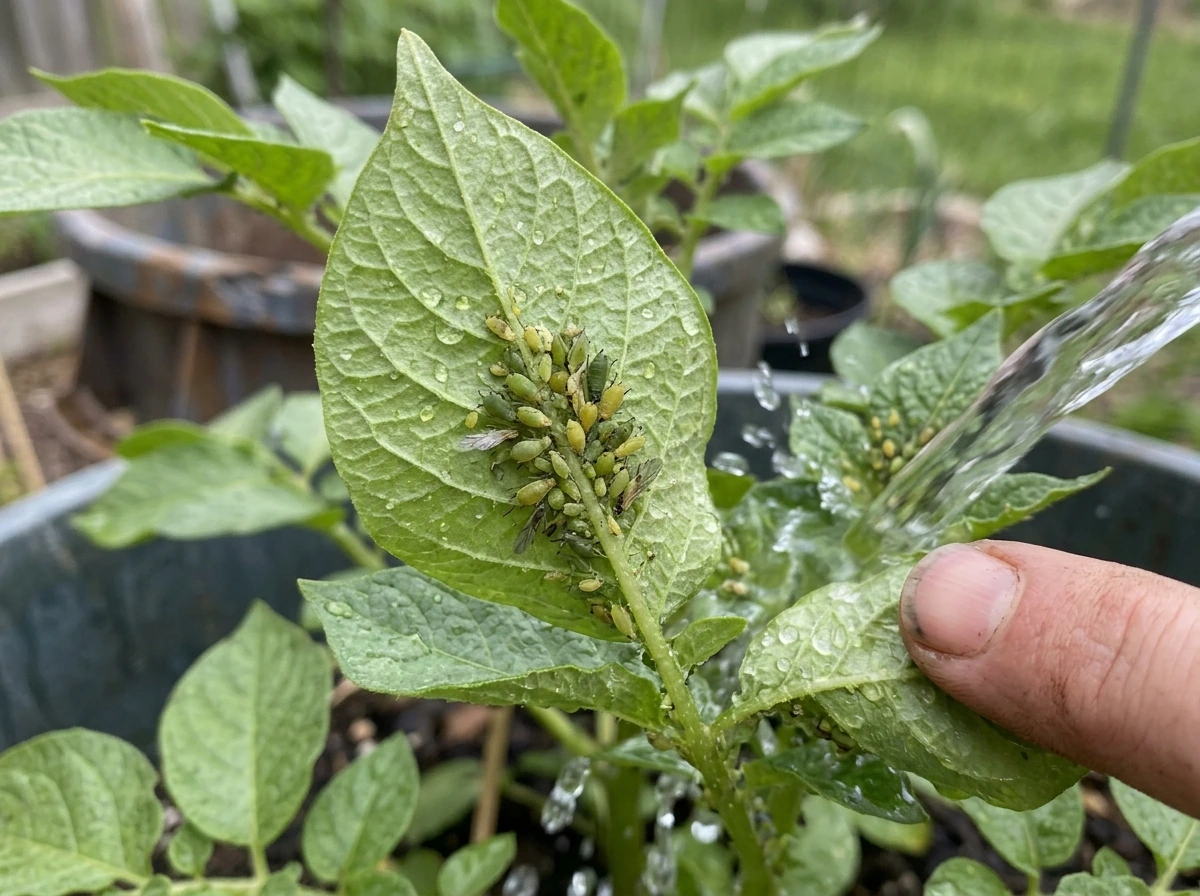
The biggest pest threat for container potatoes is aphids and Colorado potato beetles. Aphids cluster on the undersides of leaves and weaken the plant. Knock them off with a strong spray of water or treat with insecticidal soap. Colorado potato beetles are yellow-and-black striped beetles and their orange egg clusters appear on leaf undersides. Hand-pick them daily and drop them into soapy water. Because your trash can is an isolated container, you have a slight advantage: you can move it away from infested areas and catch problems early since the plant canopy is compact and inspectable.
Disease
Late blight is the most feared potato disease, caused by the same pathogen responsible for the Irish potato famine. NDSU Agriculture (Extension) notes that sanitation and avoidance practices help manage late blight and that infected tissue can be identified by characteristic leaf and tuber symptoms late blight is the most feared potato disease.
It shows up as dark, water-soaked lesions on leaves that spread fast in humid, wet conditions. Using certified disease-free seed potatoes is your first line of defense. Don't water the foliage; water the soil only. If you see signs of blight, remove affected leaves immediately and consider a copper-based fungicide.
Scab is another common issue that causes rough, corky patches on the skin of tubers. It's caused by a soil bacterium and is more likely in alkaline soils. Keep your soil pH between 5. 0 and 6.
0 for potatoes. Agriculture Victoria also notes that some scab pathogen races can damage potato tubers at about pH 5. 0 or below, while scab is generally reduced when soil pH is kept roughly in the 5. 0 to 5.
2 range Common scab of potatoes.
Container-specific mistakes to avoid
- Skipping drainage holes: this is the single fastest way to rot your crop. Always drill holes before you add any soil.
- Using straight garden soil: it compacts in containers and suffocates roots. Always use a loose, amended mix.
- Planting too early: cold, wet soil causes seed pieces to rot before they sprout. Wait for consistently warm nights.
- Over-hilling too fast: burying the plant instead of just the stem stops photosynthesis and stunts growth.
- Letting the can sit in a puddle: even with drainage holes, if water can't escape beneath the can, you've created a swamp at the bottom.
- Ignoring heat stress: a black plastic can in full summer sun in a hot climate can push soil temperatures above 85°F, which stresses roots and stops tuber formation. Shade or insulate the can if needed.
Harvesting, curing, and storing your potatoes
When and how to harvest
Potatoes are ready to harvest when the foliage dies back and turns yellow or brown, usually 70 to 120 days after planting depending on the variety. For most home gardeners using a trash can, this happens in late summer or early fall. You can do a small preview harvest before full die-back: reach into the soil near the edge of the can and feel around for small tubers. If they're marble-sized, give them more time. New potatoes (small, thin-skinned tubers harvested early) can be taken a few weeks after flowering if you just want a taste.
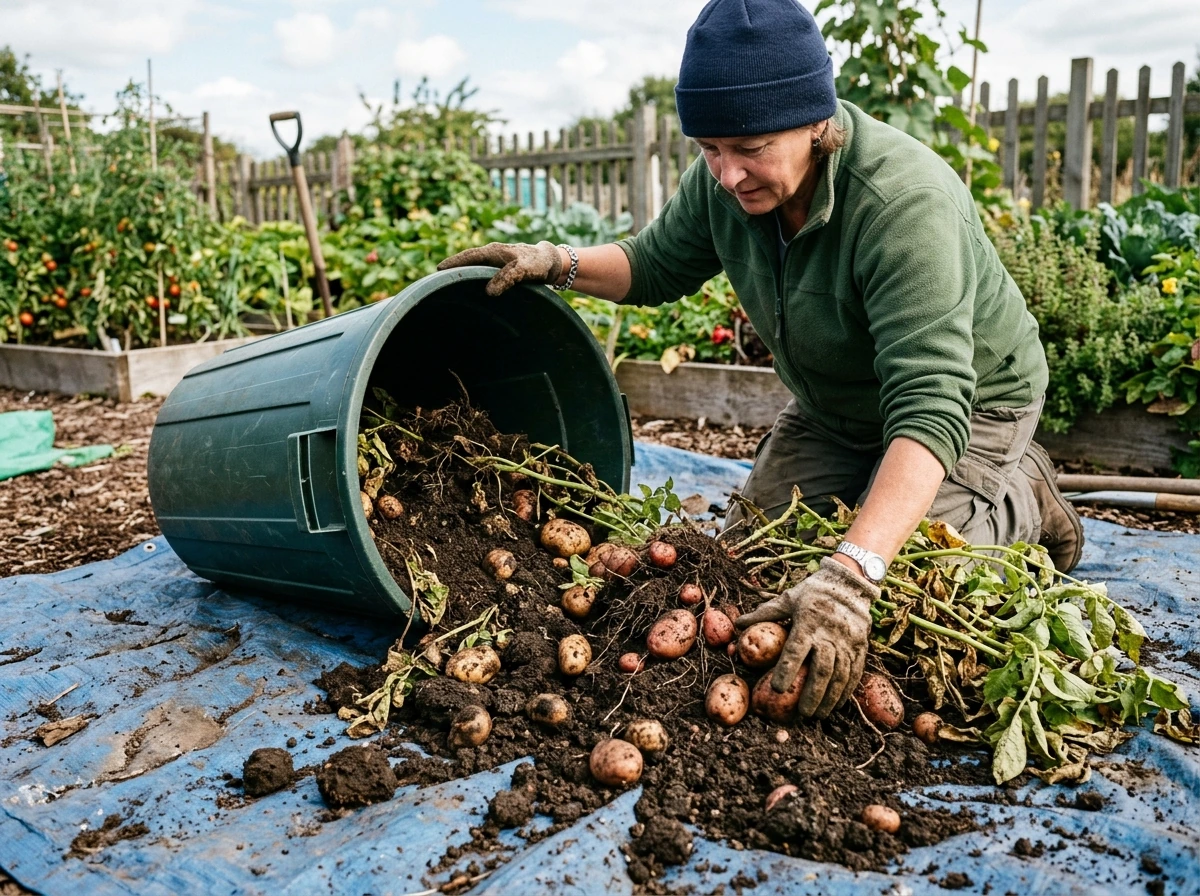
To harvest everything at once, simply tip the can on its side and dump the contents onto a tarp or into a garden cart. This is one of the best parts of the trash can method: no digging with a fork, no accidentally spearing tubers. Just dump and pick. Sort out the potatoes by size. Don't wash them yet.
Curing for longer storage
Curing is a short drying and skin-hardening process that dramatically extends shelf life. Set your unwashed potatoes in a single layer in a dark, humid space at around 50 to 60°F with good airflow, like a basement or garage corner, for 10 to 14 days. During this time, minor skin damage heals over and the skins toughen up. Skipping curing isn't fatal, but those potatoes will only last a few weeks. Properly cured potatoes can last 4 to 6 months in storage.
Storing for the long term
After curing, move your potatoes to long-term storage. The ideal conditions are 38 to 40°F, high humidity (around 90%), and complete darkness. A root cellar is perfect. For most people, a basement corner, an unheated garage in cool climates, or even an insulated cooler works. Store them in burlap sacks, wooden crates, or cardboard boxes. Never store them in sealed plastic bags, which trap moisture and cause rot. Check on them every couple of weeks and remove any that are sprouting heavily or starting to soften. One bad potato really can spoil the bunch.
| Stage | What to do | Key detail |
|---|
| Harvest | Tip can, sort tubers by size | Don't wash yet; handle gently to avoid bruising |
| Curing | Single layer in dark, humid space | 50 to 60°F for 10 to 14 days |
| Short-term storage | Cool, dark location | Use within 4 to 6 weeks if uncured |
| Long-term storage | 38 to 40°F, ~90% humidity, darkness | Lasts 4 to 6 months when properly cured |
A well-managed 32-gallon trash can will typically yield 10 to 25 pounds of potatoes depending on your variety, soil quality, and how consistently you cared for the plants. That's a real return from a single $15 container, a few pounds of seed potatoes, and a bag of potting mix. If you want to scale up, run three or four cans side by side. The system is modular, low-cost, and genuinely effective. Start with one can this season, get your process dialed in, and go from there.